The Blu-Ray Reauthoring Project
I started a project back on January 19th, 2018. I've just finished it today, October 23rd, 2018. I thought it was going to be very simple when I started, just like DVDs are. Oh boy was I wrong. I was so very wrong. Blu-Rays are very hard to edit and it's no wonder that they're dying in comparison to streaming, hell they're even dying compared to DVDs. The upfront cost of getting all the editing tools for Blu-Rays is not worth it when compared to the final result. You'd be better off just using multiple DVDs, just like how some movies had multiple VHS tapes back when those were the recording medium of choice.
Allow me to explain simply what I wanted to do. I bought two box sets of an animated series in a different language and wanted to edit the menus to be in English and add subtitles to each episode. Sounds easy, right? Well, it would be with the proper tooling, which happens to cost $10,000. That's way out of the price range of anyone that's not running an authoring business. How about writing the tooling yourself? Well you'd need a license to the Blu-Ray specification, which costs a nice over $1000 per book. And there's 3 books for each format specification, so at least $3000. And you're under some fancy non-disclosure stuff, so there's no way for you to say what you know now. With the sheer amount of steps needed due to a lack of free or relatively inexpensive, but fully featured tooling, and a lack of information about the format available for free, nobody short of enthusiasts and production factories will bother with the format at all. The format is effectively dead.
Main Issues
Because we're reauthoring a disc, we only want to edit the video file itself to contain the subtitle stream and the associated clip info file and leave the rest the untouched and still functioning. Unfortunately, most muxing tools aren't capable of generating a modified version of the input file; instead they'll choose a different presentation start time, which would mean that modifications would need to be done to all the other files. Blu-Ray operates on a similar principle as DVD, with Presentation Time Stamps to ensure display timing. However different video files in a playlist can't have the same starting presentation time, which most muxing tools will use a static start time, like tsMuxer. I found exactly 0 free tools that can reauthor a disc with files out-of-time with the rest. 3 months of time spent here trying to find a tool that did what I needed.
Sadly, Blu-Rays are specified to only have one, very horrible subtitle format muxed into each video stream, Presentation Graphics Streams (PGS subtitles). This is a bitmap format, meaning that every subtitle being displayed on the screen is an entire image being overlaid on the video. In addition, the subtitle framerate must match the video framerate, 23.976 fps. Thankfully, there's a good reference on this format. However this doesn't make it good because the few free converters to this format aren't updated anymore and have some issues to work around.
This is the case for a lot of tools that I spent time researching. If I found a tool that worked almost exactly how I wanted it to, it was no longer being updated and it was closed source. If I found a tool that didn't work how I wanted it to, it was open source but was impossible to figure out how to build or modify due to lack of documentation.
For menu editing, without any formal specification to look at, there was a lot of guesswork and research to figure out how to get the menus out, edited, and then put back into the same format. This is where I spent most of my time on the project.
I have to mention here what the format of the saved out menu images is. It's an 8-bit paletted PNG file with alpha transparency. This means that it has a pLTE chunk and a tRNS chunk. While most image viewers/editors can correctly read this data and display it correctly or create the proper channels for editing, saving out a file like this directly from an image editor is impossible. Literally no such combination of options exists. The closest you'll get is if you use Adobe Fireworks, which will happily save out a PNG with exactly that specification, but the tRNS chunk will all be the same alpha level for every entry. Not useful at all and doesn't take advantage of any of the benefits of such a format. My mind boggled over this for over 3 months before coming up with a solution.
Blu-Ray menus are Interactive Graphics Streams (IGS). Their breakdown is fairly straightforward, but exact specifications are, you guessed it, basically nonexistent. A number of patents can be found relating to this format, but they're not a complete reference.
Project Details
Ripping Discs
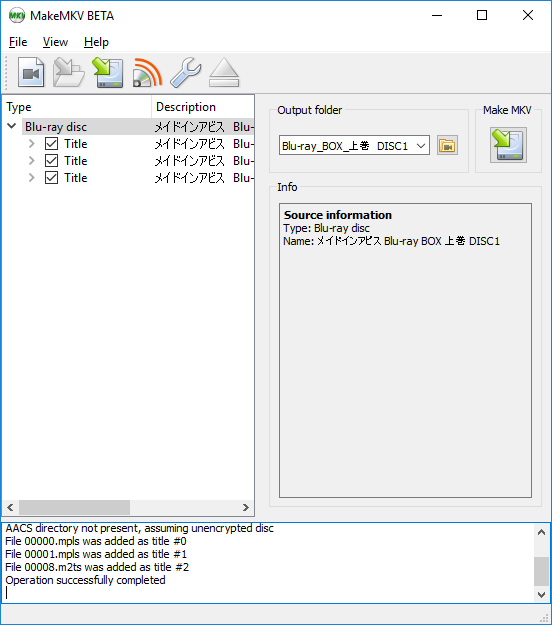
In order to reauthor discs, you'll need to have unencrypted files to edit. Discs from authoring shops are AACS encrypted, but because that was broken due to some leaks, this is pretty easy. Grab a copy of MakeMKV and rip the disc, not to MKV files but just to a file folder. You should be able to grab a beta key from the subreddit.
Subtitling
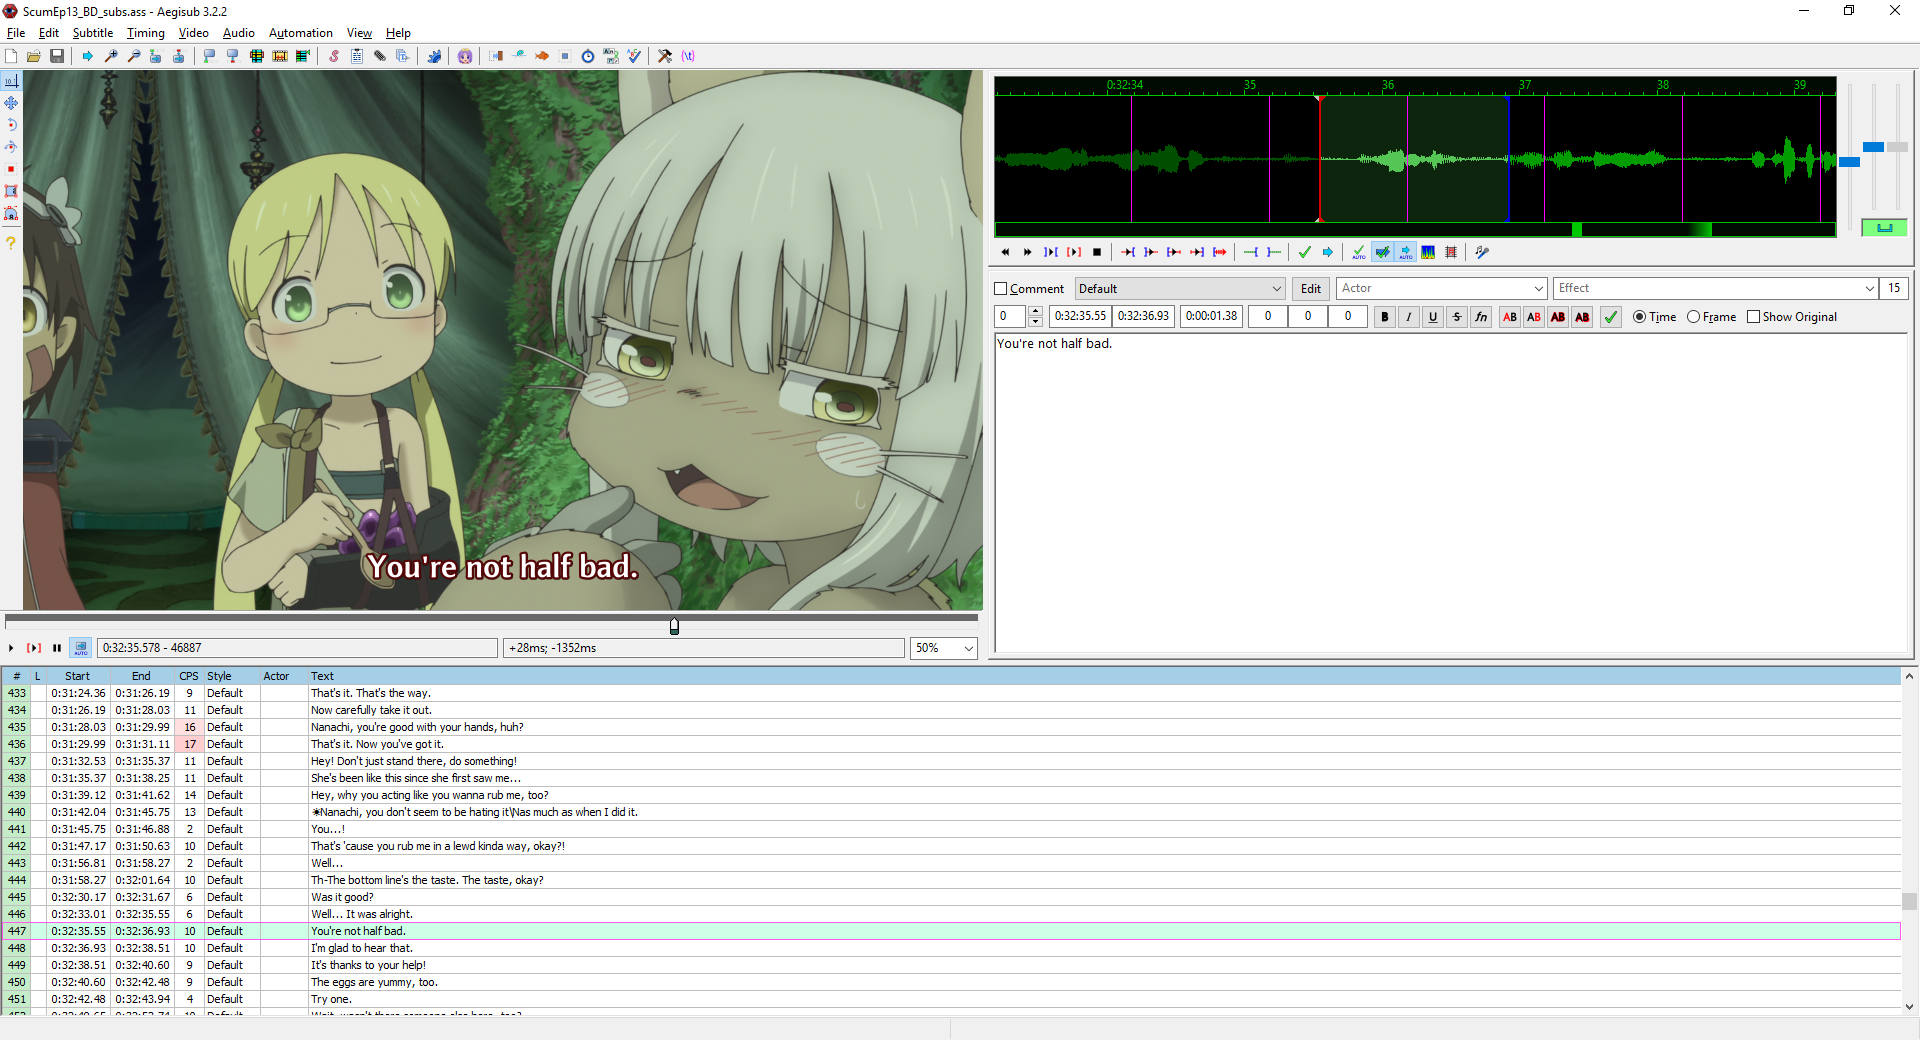
This is by far the easier of the two tasks (subtitles and menus) I had in mind. You'll need Aegisub to perform the subtitling in the Advanced Substation Alpha format. This is by far the best format for subtitles; think of it like CSS. Find the right M2TS file in the STREAM directory of the ripped disc and subtitle it. I'm not here to give a guide, there are plenty that explain how to use the program. I'm not fluent in the original language of the Blu-Ray, so I used a base set of subtitles and cleaned up their timing and styling. Unanimated has a number of scripts that he uses for subtitling and has released to the public, you may find them immensely useful.
Subtitle Conversion
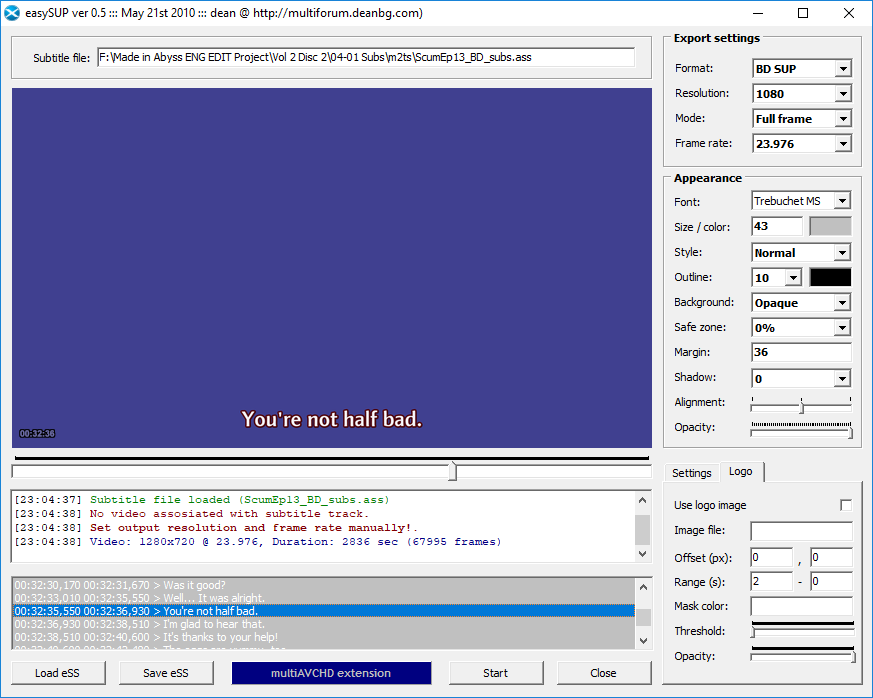
We'll need to take the text-based ASS file and convert it to a SUP file, which is what contains the PGS. We'll be using easySUP to convert our ASS file to a SUP file.
As a preprocessing step though, easySUP doesn't deal with newlines in dialogue lines correctly. In order to remedy this, adding a {\q1} tag to the start of dialogue lines with newlines in them solves the problem of them not being rendered correctly. I've written a small shell script that check to make sure that all your dialogue lines are correctly formatted with this in mind.
Subtitle Muxing
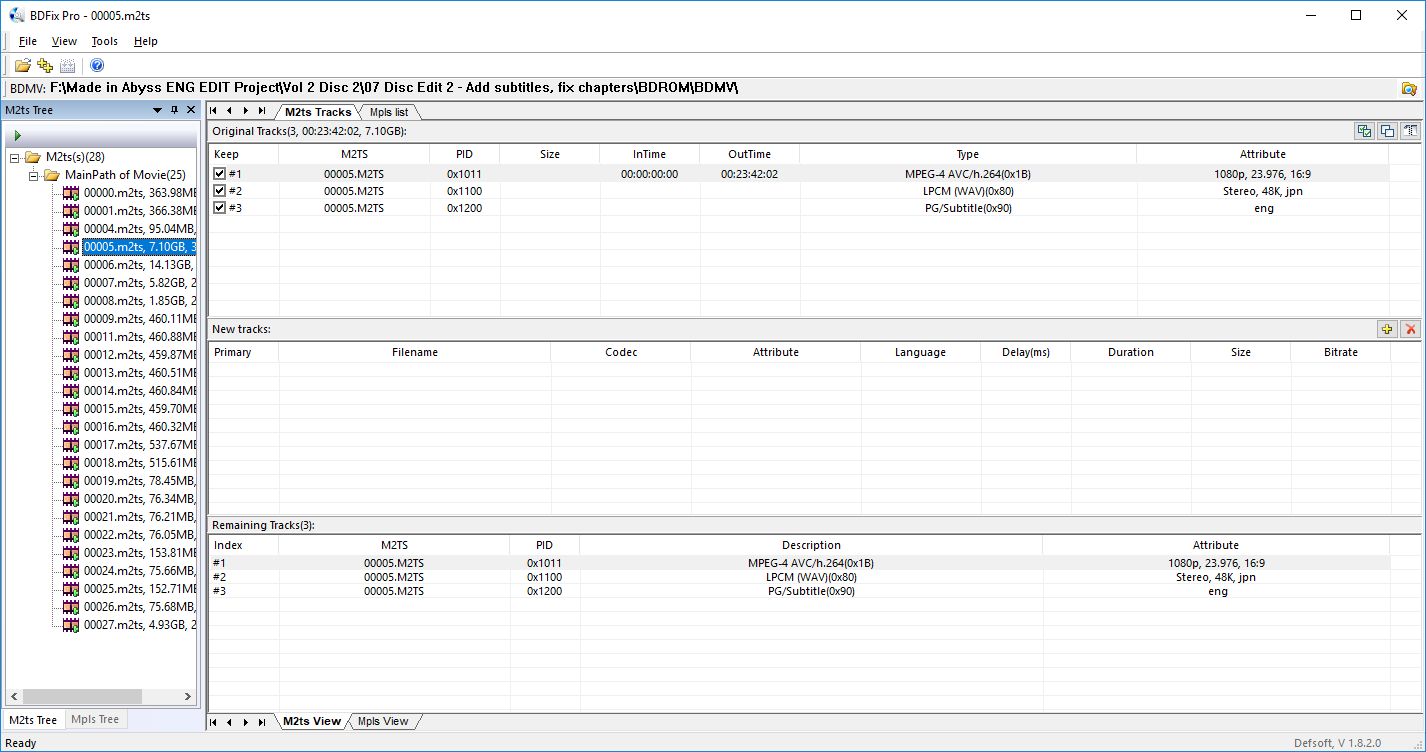
We'll use BDFix Pro for subtitle muxing. And now there's a bit of a dilemma. See, technically the program is something you'd need to buy for $139 or more (up to $399). However, trying to buy the tool results in an empty cart page and no way to actually purchase the software. The last release of the tool being in 2012 and the copyright on the website being last updated in 2014 means that I don't believe the tool is being updated anymore. Update as of September 2021: Defsoft is defunct entirely. I have no qualms about not buying the software anymore since there is no other way to get it.
You can find a copy of the BDFix Pro installer and a keygen here. And a MEGA backup here with some instructions The tool is self explanatory, just put in your subtitles and remux the disc files.
Menu Editing
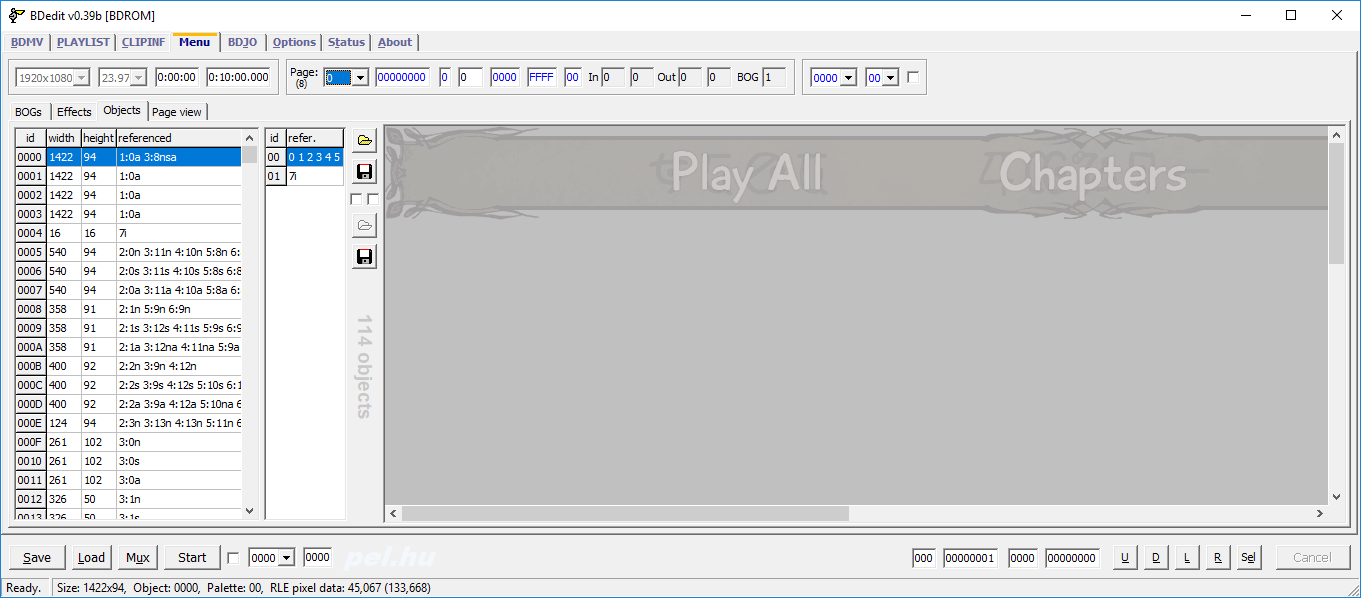
I'll break this section into 3 substeps; this is subtsep 1, image saving. We'll be using BDedit for a majority of the rest of the editing. Open up your Blu-Ray folder and go to the CLPI tab. Select the CLPI file that contains the IG stream for your menu and hit the -> Menu button above. Go to the Objects tab and save out EVERY SINGLE OBJECT.
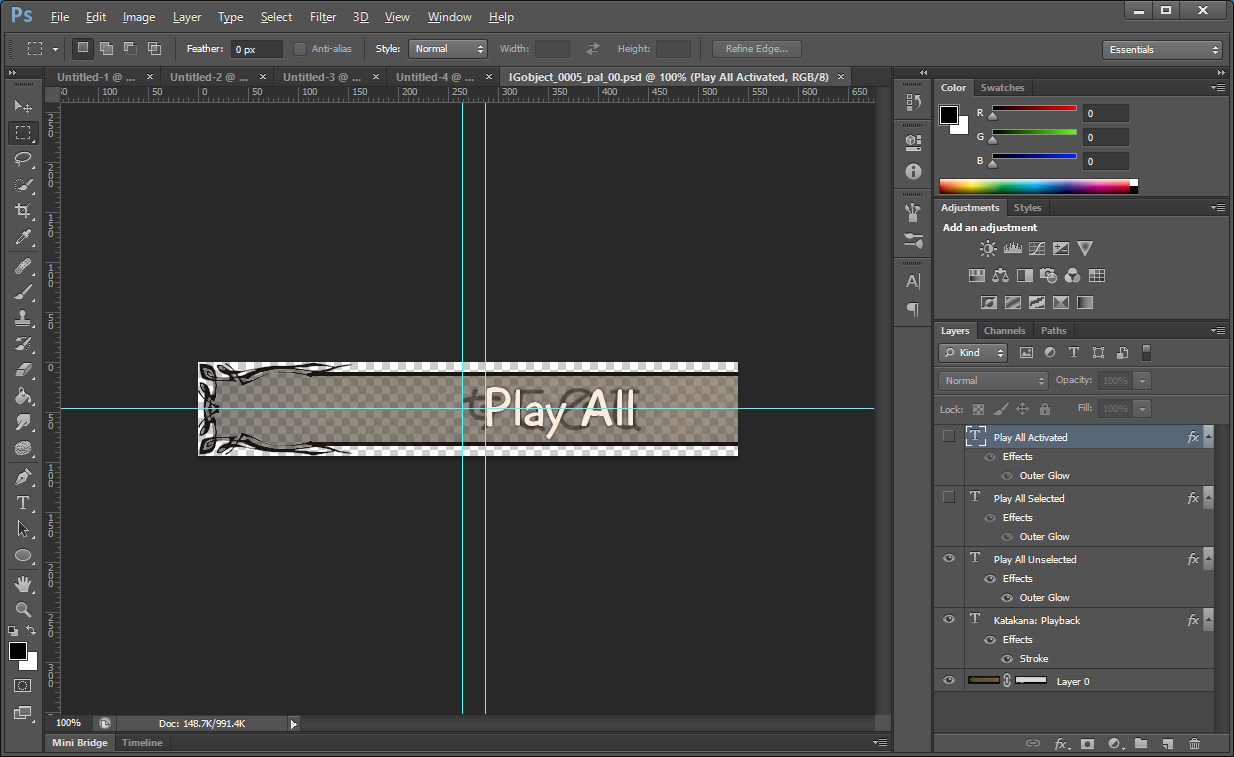
Substep 2, editing. Use Photoshop or GIMP or whatever tool you need to get it all looking like how you want. You'll have to have 3 images for every button, a non-selected version, a selected version, and an activated version. I recommend loading in one image as a background and then having 3 different layers for the different versions. Save these out as whatever format of RGBA PNG you prefer, but keep the filenames the same for ease later.
Now we're going to run them through an image quantizer. IG streams have a section of palettes that each image uses to determine what colors to use to save on space. Generally, all of the images will use the same palette. Directly editing the palettes of images is a bad idea because you'll definitely make it look horrible. Instead, pumping them through a tool that takes in all the images and generates a single palette for them is ideal. I've made that tool with the help of libimagequant and LodePNG. It takes a single argument, a directory of images to quantize, and spits out a new directory in that one containing all the images with the correct palette inside them. I highly recommend at this step to manually piece together the images into the different ways they'll be displayed on screen so that they don't look weird. Fixing these continuity errors now will save you a lot of time when doing the next part.
Substep 3 then is loading everything back in and muxing out a new menu file. Go back to the Objects view, and replace the object image and the associated palette for EVERY SINGLE OBJECT. You'll see that because you replaced the palette in one file, pretty much every other object will look like vomit. This is why I recommend pre-checking in the previous substep, because replacing every image takes a while and you don't want to do it multiple times.
Once everything's in place, hit mux at the bottom, close out of BDedit and replace the appropriate M2TS file for the menu. Reopen BDedit and go back to the CLPI file; a new window will appear, hit yes, because we've changed the M2TS file and the number of transport packets inside has changed.
Final Editing
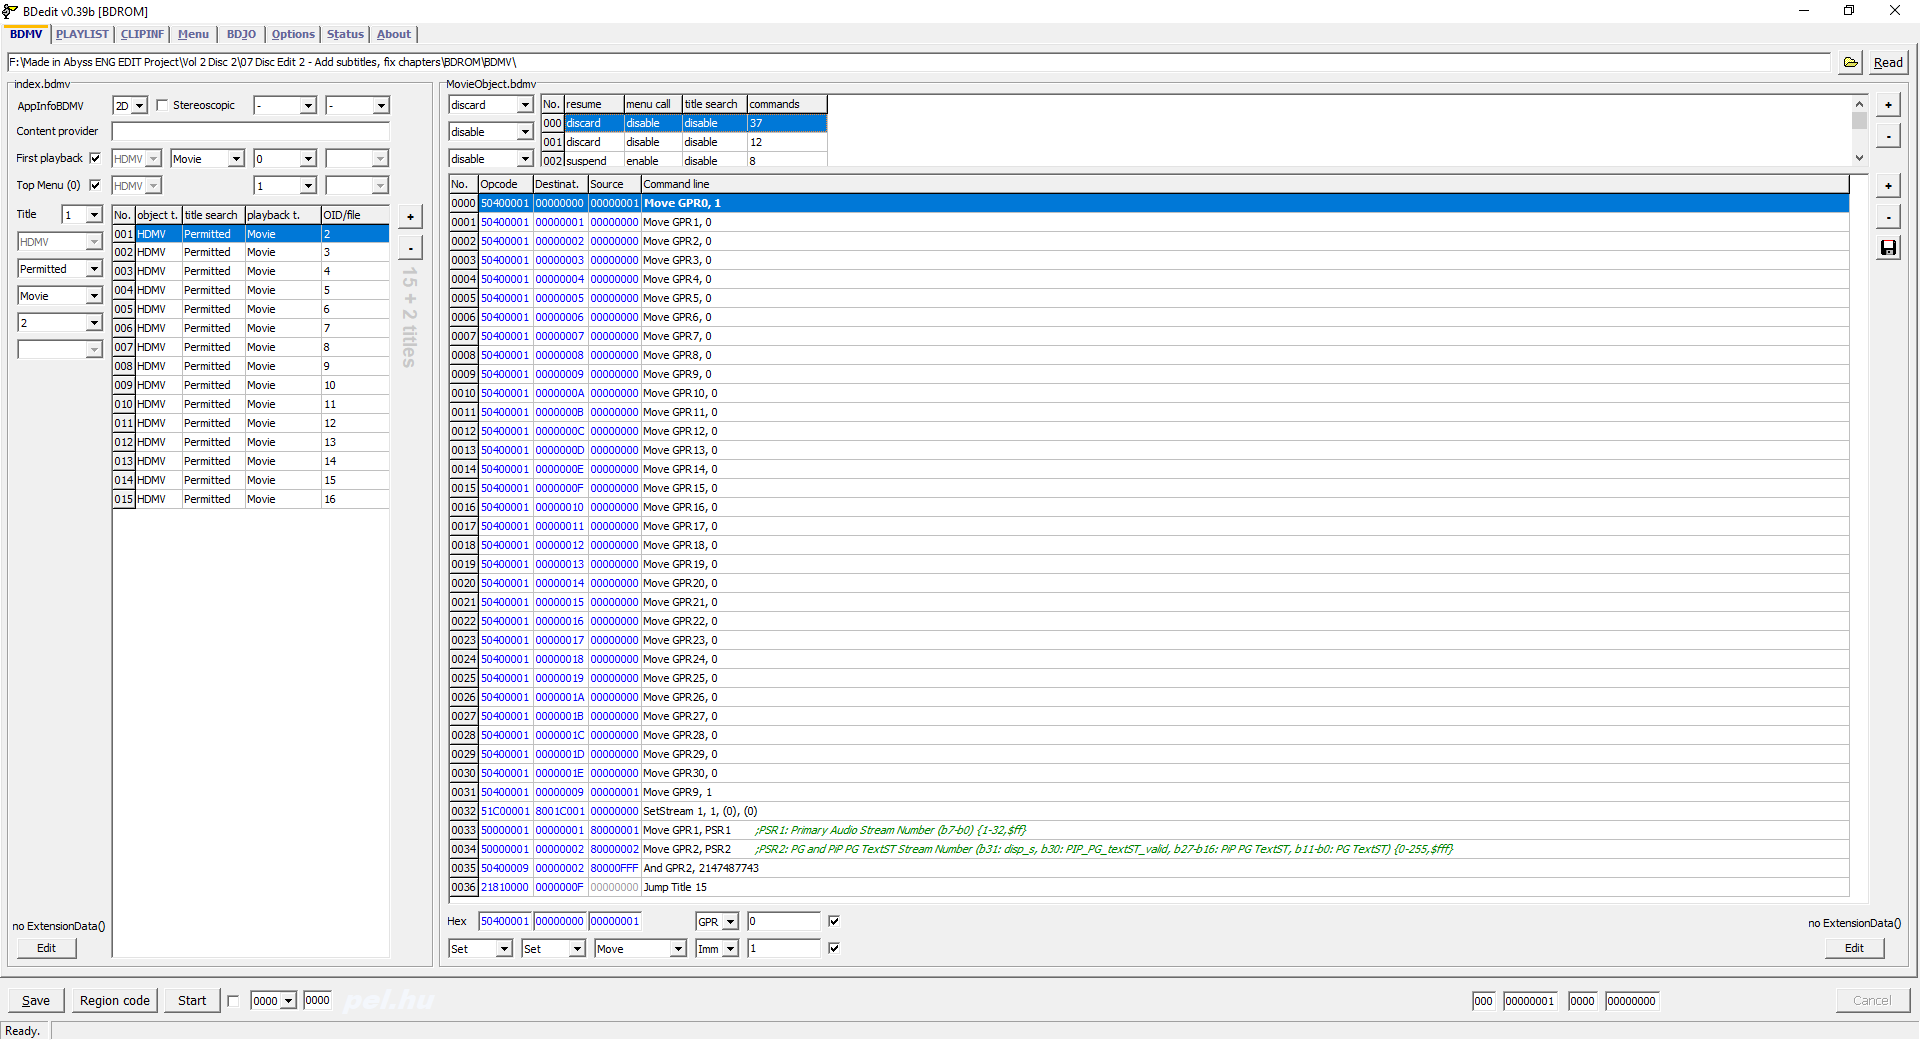
We're at the home stretch here. As I was editing, I realized that I wanted subtitles to turn on by default and to skip the intro copyright movie, because both of those are good quality of life changes. Removing the intro copyright is as simple as finding the correct Play PL command in MovieObject.bdmv and deleting it.
Turning subtitles on by default is easy enough. In the first playback movieobject, add a command just near the end of the command list, or find one that says SetStream. The command should read (in hex) 0x51C00001 0x8001C001 0x00000000. Effectively you're saying Set audio track 1, turn on PGS 1, set IGS 0, set angle stream 0. Additional info can be found here.
ISOs and Finalization
The last thing we need to do is build a disc image and test it. We'll use ImgBurn to do that (be sure to download directly from the site, not any mirrors. I got adware from one of the download links on the official site). Use the "Create image file from files/folders" option. Select your folder, set your output name. Wait for it to build.
Now to do your tests. You can do this at any time really, and I recommend it. Download PowerDVD 18, it is by far the best Blu-Ray player I've used, including hardware players, which are seriously underpowered as it seems. Also install Daemon Tools or some other software to mount an ISO onto a virtual disk drive. Test it as if it was a regular old Blu-Ray that you would have bought from the store. Make sure your menu images are working correctly, make sure your subtitles are correct, check that subtitles turn on when you expect them to, and that anything you wanted to skip playback does. Lots of Blu-Rays have a chapter select of sorts, and the subtitles might not appear immediately if you go to a chapter. You'll have to adjust them in the PLAYLIST tab for the appropriate .MPLS file. The PlayListMark section lists the chapter times, which you'll need to edit; adjust chapter times back 1 second if you're not seeing a subtitle appear when you expect it to, repeat if necessary, rebuilding between changes.
Burning Discs
You've finally got a finished disc image. Congratulations! It was probably a hell of a lot of work to get to this point. But now's the easy part. You can use either ImgBurn or CDBurnerXP to write your image onto a BD-R disc. Look at the size of your file folder; if it's above 25GB, you'll need dual layer discs that store 50GB. If it's above 50GB, I'm so sorry that you have to buy quad-layer 100GB discs, which are VERY expensive. The discs I had were 50GB, so I purchased some Optical Quantum inkjet printable BD-R DL discs. Burn onto your discs and VERIFY THE DATA. I've heard that Blu-Rays are prone to "coastering", which means that the data written to the disc isn't what you actually have, turning the blank, single write disc into a completely useless circle of plastic. The blank discs I bought had no issues in the 5 I've burned so far, one of which was a mistake disk but still worked fine.
Disc art
This is an optional step really, but you can scan the disc and edit the art, or make your own disc art. Get or find someone that can print onto discs (labels are garbage). I've edited the art to include an "English edit" line, but it looks like very few printers are around that print at good quality.
That's it. You're done. I'm very proud of you for dealing with all this to get a product that you can call your own. Months of research went into this, countless days of confusion and frustration over what should have been simple to do or fix. The solutions were easy once I knew what to do, but figuring out what to do was difficult when there was no real starting point to go off of.
Perhaps you can see though why Blu-Ray is a dying format now though. Too much work for what appears at face value should be very simple. We need a new disc format specification if we are to using plastic circle storage media as a consumer product in the future. Something not based on older proprietary technologies that are unsupported except on very expensive software, but rather based on open source formats that let the format flourish and continue to exist well into the future even when not actively developed. The amount of trouble to put together a professional presentation as a consumer is not worth the effort from a layman's point of view.
I'd like to thank the great community over at Doom9 for writing and providing so many excellent tools and support.
[1] Additional Blu-Ray information: Blu Ray menu editing guide
[2] Side note: Leawo Blu-Ray Player is very bad in comparison to PowerDVD. I do not recommend it. It is buggy and doesn't have mouse menu control somehow.